
How to Fix a Negative Accounts Receivable Entry when Using QuickBooks Online
- Go to the gear box in the upper right corner and click Under “Your Company” go to “Account and Settings.”
- On the left side go to “Advanced” and under Automation turn off “Automatically apply bill payments.” Be sure to Save and then click Done.
- On the left side is a dark section with a button called “+ New” at the top. Click the “+ New” button and select “Invoice”.
- Enter the customer’s name, and the date on which you are writing off negative receivable.
- Under “Product/Service” choose what the client did regarding the payment showing as a negative receivable and enter the amount as well as clicking the box if the transaction was subject to sales tax.
- Click the green “Save button” in the lower right corner.
- The next screen shows the invoice and in the upper right corner is “Receive Payment.” Click that box.
- The next screen shows outstanding invoices and the one that you just made. Unclick all of the other invoices so the amount of the invoice just prepared equals the “Unapplied Payment” which is lower down the screen. In the lower right is a green button and next to it is white arrow. Click on the white arrow and select “Save and Close.”
Why shouldn’t you use Adjusting Journal Entries to correct Accounts Receivable Errors?
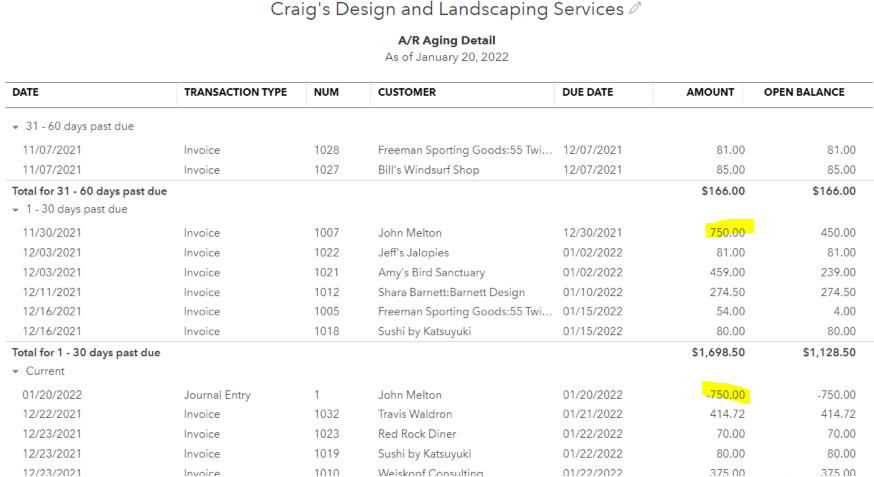
As you can see above, the AJE did not remove the receivable from the A/R aging detail list. The AJE just created a negative receivable.
To learn more about this issue, watch our YouTube video here.